The netcam plugin from Homeseer is a basic tool to grab pictures from your network cameras. To use motion areas, virtual devices |(when a camera is triggered), grab snapshots, start recording of cameras, then (a connection to) BlueIris is a much nicer piece of software.
I have this setup already for more than 4 years, but see a lot of people struggle to get it working. Hopefully this will clear up the questions and give the benefit of a free communication tool (except Homeseer and Blueiris).
This tutorial don’t need the BlueIris plugin in Homeseer.
What do you need:
- Homeseer 3
- BlueIris (v3 / v4)
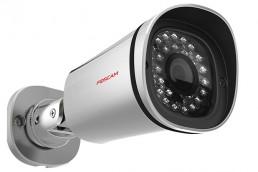
- Camera(s) that is/are compatible with BlueIris
- Virtual device(s) in Homeseer
- Free tool “BICommand.exe” (download link at the bottom of the page).
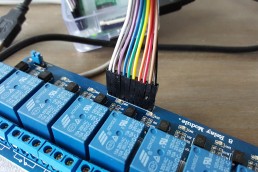
BlueIris camera configuration
Basic start is to setup your camera(s) in BlueIris. The shortname of the camera in the camera properties is left as default name (like: cam1, cam2 or cam3, etc)
I use different time profiles, for during the day and night, so specific areas will be watched. In my case it’s just a matter of time profiles (setting within BlueIris). The scheduler in BlueIris will switch the different time profiles automatically.
Queue images
When the camera is configured, in the Post tab of the camera, a file will be queued to my local webserver with the name of the camera. This image will be used in several tools (i.e. HSTouch), to provide to last motion triggered picture but also on a running website to provide data from Homeseer (as a replacement of HSTouch).
Request from web service
Finally in tab Alerts, the option “Request from web service” is activated. In the “When triggered” section of this option, a JSON command is added to control a virtual device in Homeseer. The virtual device is created to monitor that specific camera when the last motion is triggered.
Homeseer configuration
The virtual device is just a standard On/Off virtual device, even the Status Only checkbox is not selected.

like:
http://
<HS3-IP>/JSON?request=controldevicebylabel&ref=179&label=On
So in case when the camera will trigger motion, a web request is activated to Turn On a virtual device(HS3 ref=179) in Homeseer (and other actions, like events are possible because of this device status change).
In my case, when the virtual device is triggered, an event will start with the following commands (the “netcam” folder in the urls below don’t need the actual “Netcam” plugin):
- Run a script – Execute immediately script command: &hs.GetURLImage(“http:\<camera-ip>:<camera-port>”,”\snapshot.cgi?user=<camera-user>&pwd=<camera-password>”, TRUE, 80, “\html\netcam\voordeurcam.jpg”)
- This command will grab a picture from the camera and store it in the Homeseer HS3\html\netcam folder with the name “voordeurcam.jpg”. This image will be used in a later command.
- Run a script = Execute immediatly script command: &hs.setdevicestring(179, “<a href='<webserver-ip>:<webserver-port>\voordeurcam.jpg’ target=’_blank’><img src=’http:\\<webserver-ip>:<webserver-port>\voordeurcam.jpg’ width=’150px’></img></a>”, true)
- This command grab the queued/posted image which is created earlier in BlueIris, and store it as an clickable (web)link in the devicestring of the same virtual device in Homeseer.
- Set a device – in this case the virtual device with ref 179 to Off (which means BlueIris can set is to On again the next time motion is triggered).
The complete virtual device will be shown like this:

When you click on the image (blurred in this case), a new browser tab will open with the image in actual screen resolution of the camera (640×480, 1920×1080, etc).
Control BlueIris from Homeseer
It’s possible to control the camera in Blueiris, from Homeseer. For this you’ll need the free tool “BICommand.exe” It was long time ago available on the “cam-it.org” website, which is currently down but you can download it at the bottom of this blog post.
This executable has to be copied in the root of the Blue iris installation folder, in my case: “C:\Program Files\Blue Iris 4”. Be aware that Blue Iris 3 is installed in the “Program Files (x86)” folder and BlueIris 4 is not.
With the BICommand tool several commands can be accomplished, like:
| trigger | triggers an motion event |
| recstart | starts manual recording of the camera(s) |
| recstop | stops manual recording of the camera(s) |
| snapshot | takes a snapshot of the camera(s) and stores it in the recording folder |
| reset | resets the camera(s) |
| enable | enables the camera(s) |
| disable | disables the camera(s) |
| profile | enable a specific profile |
The command has to be entered in a .bat file.
In my setup, the bat files are stored in the Homeser Scripts folder. The name of a bat file can be anything, like “cam2enable.bat”. The file will enable cam2 in BlueIris. The bat file contains the following data (with quotes!!):
Location-BICommand command shortname-of-camera
| “C:\Program Files\Blue Iris 4\bicommand.exe” enable cam2 |
The bat file will be launched from a Homeseer event:
Action in the event, choose for “Run another program or process”. Point to the Homeseer/Scripts folder and select the bat file, in this case “cam2enable.bat”.
Run the event and you will see in BlueIris that the camera will be disabled. Why do you want to disable a camera? For example, when you are at home, the camera stream in the livingroom can be disabled in BlueIris, because otherwise it will be triggered all the time, which is probably not necessary. Or enable a camera when the alarm-away mode is activated and disable it until the alarm is deactivated.
Another case could be start recording for specific cameras, based on needs from Homeseer. The command in one bat file could be:
| “C:\Program Files\Blue Iris 4\bicommand.exe” recstart cam1 “C:\Program Files\Blue Iris 4\bicommand.exe” recstart cam2 “C:\Program Files\Blue Iris 4\bicommand.exe” recstart cam3 |
Downloads:
 BICommand (195.3 KiB, 970 hits)
Wow. This is great, you just saved me from a lot of stress. I’ve wasted hours searching for the right tool. I thank God i found your great information.
Thank you! I needed to send pictures for medical purposes, and your advice was much appreciated. I cannot believe they haven’t come further in 2014, technologically, speaking user-friendliness. Can here mention that Logitech web-cam has the same software problems as in .
Great, but is there any free software with “”effects,”” like capturing the background before you go into the video frame, and then replacing that background with whatever picture you want. I don’t know what this is called?? Maybe a “”virtual green-screen?”” — There was a free app (program, don’t know why we call everything apps anymore, but anyhow…), given away over a year ago by a daily free software giveaway site called MagicCamera, it can do this or it can put snow over your screen, or it can put a goofy picture over your face and follow your movements so that it looks like you are wearing a mask, etc. … Is there anything free like that out there.
I’ve had my laptop for a little over an year now. I’ve used my webcam multiple times but I was always annoyed that it did not have any recording software. Little did I know that it was as easy as Fn + V…..Thanks a lot for the video! Works like a charm. Had to install/uninsall several shitty programs before I found I had a built-in software that works perfectly.
I do accept as true with all of the ideas you have offered for your post. They are very convincing and can certainly work. Still, the posts are too brief for novices. Could you please prolong them a little from next time? Thank you for the post.
I was just looking for this info for a while. After 6 hours of continuous Googleing, finally I got it in your web site. I wonder what’s the lack of Google strategy that do not rank this type of informative websites in top of the list. Generally the top web sites are full of garbage.
Hi Eve,
just 6 hous of Googling?? I spend much more hours to get this working 🙂 I’m glad you liked the information on my blogpost.
Wonderful site. Lots of useful info here. I’m sending it to several pals ans additionally sharing in delicious. And obviously, thanks to your sweat!
Thank you so much. I was going nuts. I’ve had my Laptop for a few years now and never had a need to use the camera until now so I didn’t bother with it. You saved me a headache. Thanks again.
I don’t have ASUS at my ‘all programs’, what’s that about? I’m sure I have a working webcam though, it works it Skype and such, I’d only like to open the webcam software. Any help there? :)
Hi Victoria,
I actually don’t know what you mean. Can you clear up the question a little bit?
Someone necessarily assist to make critically articles I would state. This is the very first time I frequented your website page and thus far? I amazed with the analysis you made to create this particular put up incredible. Great process!
Thanks for this article. Can you send me a copy of BICommand.exe, please?
Tnx for the comment. The executable is send by email.