With the move from a house to an apartment, new challenges has to be made, for example monitoring the mailbox sensor, which is 5 stories below, the door sensor of the storage in the basement, or maybe the occupancy of the car in the basement garage. Wifi signal will not reach all the sensor, trough the concreete and iron construction, or is not stable enough. Lora could be an solution because the range is much higher (in open air), but without testing it, you will never know the answer. For testing, this setup is quit expensive. If this test fails, the LoRa setup is useless for this purposes but could help other to connect their devices to the LoRa network..
Out-of-the-box gateways are quite expensive for a first setup. The Lorix or the TTN gateway itself are starting from 400 euros. In case you have a Raspberry Pi doing nothing, you already have a cheap basic start. To connect the Raspberry Pi to the LoRa network, you can use such as a IC880A-SPI interface. In The Netherlands you can have such interface for around 120 euros.
As a noob in the LoRa community, I had to see if there was at least some LoRa signal available. So I bought the “Node” from The Thing Network for appr 65 euro. Quite expensive, but without knowledge to build a node myself, it was the first start to get familiar with LoRa. I registered the device on the TTN console, but nothing happens. KPN promised an overall coverage both indoor as outdoor, even in my environment, but it’s not free of costs, and because I want to continue with LoRa for now, I’ve build a 8-channel gateway with the tutorial below.
On the following link, a map of all gateways can be found. Zoom in to your location and see what the network coverage is in your neighbourhood: https://www.thethingsnetwork.org/map
What do you need?
- Raspberry Pi. In my case I use the newest model 3B+ with a 16GB micro SD card + power supply (the tutorial steps below will work on the following models: RPI 3, RPi 2B, RPi B+ and even RPi Zero)
- iC880a-SPI LoRa interface (for EU the 868 Mhz edition).
- SMA antenna with 1/2 wave length and at least 3dBi. I’ve chosen for a 5dBi antenna.
- Pigtail U.FL to SMA female to connect the antenna to the iC880a-SPI interface. I’ve a 100mm model.
- USB wifi dongle
!!! The warning, as visible in many tutorials, is always connect the antenna and pigtail to the iC880a-SPI interface first before powering up, otherwise the interface will be damaged !!!
To setup of the Raspberry and LoRa interface is already available on other websites. Even the registration of the gateway on The Things Network will be explained here:
https://github.com/ttn-zh/ic880a-gateway/wiki#setting-up-the-software
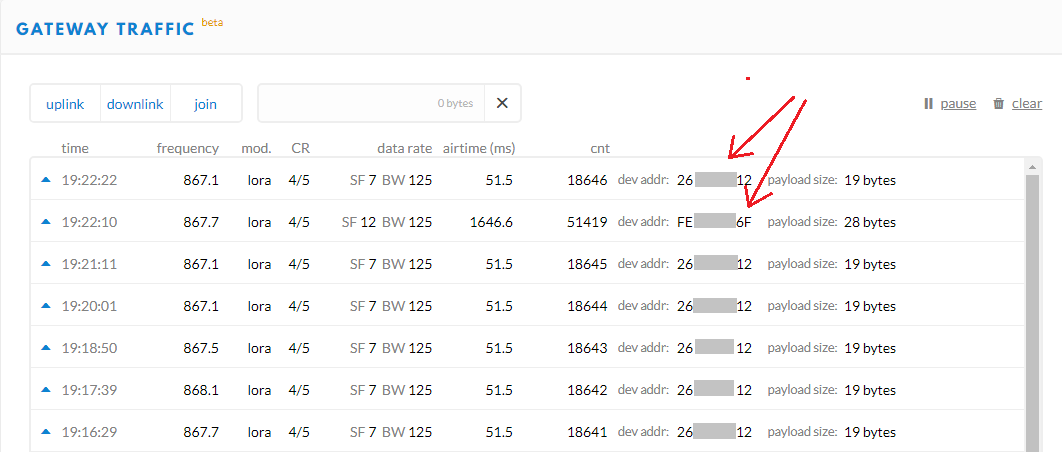
In the end when your LoRa gateway is connected to the The Things Network console and your Node is registered as well in the console, you can check tab “Traffic” from the gateway if you receive node packets. In this from 2 nodes data is received by the gateway. The node on the first line (my personal node) have sent 18.646 packets till now. The node in the second line already 51.419 times which is from an unknown person, but when you open that data packet, you can see that the node is originally registered on a different LoRa network (KPN), instead on The Things Network.
To make a long story short: Five floors below, 25 meters ahead (not diagonal), the TTN Node is placed inside the building mailbox.. The Node is sending every minute a signal and the great result is that my gateway is receiving that signal 🙂 So at least I got signal from the mailbox. The test is successful!! I can now continue testing other locations in the building/neighbourhood for signal reception and building my own cheaper nodes.


Is it possible to build multi channel gateway with Raspberry Pi using SX1276/1278 modiles ?
Este gateway serviría para recoger información de nodos con sensores para la agricultura