Based on a topic on the Domotiz forum and the new setup from my side regarding the readings from my new smart meter (DSMR5) and a need to have solution too for the watermeter. I want to get rid of the RFXmeter with infrared sensor, so this is a good opportunity for switching hardware. My Watermeter has a small grey reflective area on one of the readers, so in theory I should do something with the reflective part of it. The reflective part is showing for every 1 liter of water:

What do you need?
- A working Raspberry Pi. In my case I use an older Pi 2B. For my setup I installed the Raspbian Stretch Lite ISO: https://www.raspberrypi.org/downloads/raspbian on a 8GB micro SD card.
- 3 jumper wires (female) to connect the NPN sensor to the GPIO on the Pi.
- One inductive proximity sensor, like LJ12A3-4-Z/BX sensor N/O NPN 4mm. 3 wires. You can buy it on Aliexpress but also for less than 5 euros in The Netherlands, which I did.

Connecting wires
The NPN sensor have 3 wires:
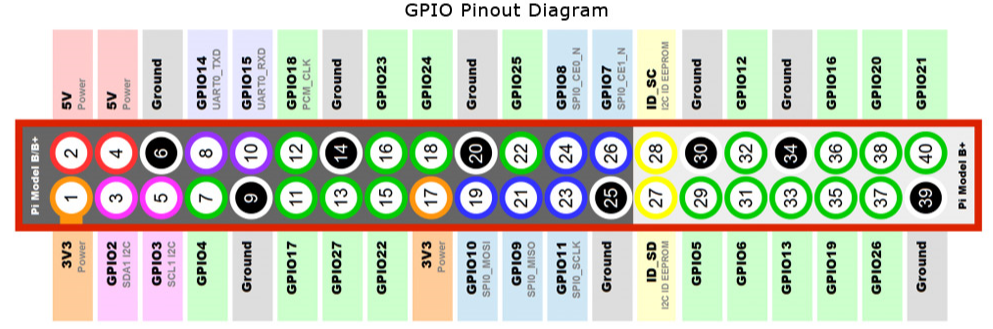
Blue= GND (pin 6)
Brown= 5V (pin 2 or 4)
Black = GPIO (a GPIO input, for example GPIO4 at pin 7)
The NPN sensor operates normally between 6-36 Volt, but for this purpose the 5Volt from the Pi is enough for unknown reason…
After the 3 sensor wires are connected to the Pi, you can actually test the sensor. On the sensor there is red led (next to the cable connection). If you hold a piece of metal (knife, screwdriver) within 4 mm of the blue top, the red led should be activated.
Homeseer configuration
I’ve chosen for a Homeseer counter that will be increased. It’s a different approach than that is shown in the Domoticz topic, but in the beginning I want to see if the readings are accurate and later on I can change the whole setup if needed.
In Homeseer, create a new counter via “Tools” – “Global variables, Timers & Counters”, like this:

Because a counter can’t be controlled by JSON, nor via the RestAPI, an event is necessary to increase the counter. The Python script on the Pi will call this event to control the counter.
As visible in the screenshot below, the event groupname = “Energy”. This name could be different in your setup, but is necessary in the Python script later:

Tto call this particularly event, the following command has to be used:
“http://homeseer-ip:port/JSON?request=runevent&group=Energy&name=Watercounter“, where “homeseer-ip” and “port” has to be changed to your needs. Test this url in your bowser to see if the createdevent is increasing the counter.
Thoughts that can be done, but are not necessary:
- For copying files to the Pi, and even test everything I use the free tool “MobaXterm Personal Edition“. Use the “sudo raspi-config” console command ithe enable SSH access in the interface first.
- In the raspi-config, set your timezone correctly (via Localisation Options – Change Timezone)
- In the raspi-config, enable console auto login (via Boot Options – Desktop/CLI – Console Autologin Text console).
On your local computer create the “watermeter.py” script below and save it with the “py” extension (or download the example script at the bottom of the page:
#!/usr/bin/env python
import RPi.GPIO as GPIO # Import Raspberry Pi GPIO library
import urllib2
import datetime
# = GPIO 4 =
TrackingPin = 7
def button_callback(channel):
datetime.datetime.now().strftime(“%a, %d %B %Y %H:%M:%S”)
print(datetime.datetime.now())
print(“1L of water is used”)
url = “http://homeseer-ip:port/JSON?request=runevent&group=Energy&name=Watercounter”
f = urllib2.urlopen(url)
print f.read()
GPIO.setwarnings(False) # Ignore warning for now
GPIO.setmode(GPIO.BOARD) # Use physical pin numbering
GPIO.setup(TrackingPin, GPIO.IN, pull_up_down=GPIO.PUD_DOWN) # Set pin TrackingPin to be an input pin and set initial value to be pulled low (off)
GPIO.add_event_detect(TrackingPin,GPIO.RISING,callback=button_callback) # Setup event on pin TrackingPin rising edge
message = input(“Script started. Press enter to quit\n\n”) # Run until someone presses enter
GPIO.cleanup() # Clean up
In my case have copied the script to the following location: ~/home/pi/. Via the MobaXterm tool it’s easy drag & drop. In case you want to store the Python script somwhere online, you can use the following command on the Pi to grab the file:
wget http://<domain>/watermeter.py

When the Pi is having a reboot, we want to have the script started automatically:
sudo nano /etc/profile
Scroll to the bottom of the file and add the following line of code (where “/home/pi/watermeter.py” is the path to your script):
sudo python /home/pi/watermeter.py
Type “Ctrl+X” to exit, then “Y” to save followed by “Enter” twice.
P.S: If you don't want to see any script output on the console screen, you can replace above line with:
sudo python /home/pi/watermeter.py &
To test the changes, give the Pi a reboot with command:
sudo reboot
If everything is set correct, the following line will be visible in the console after reboot:

When you now hold a piece of metal within the 4mm sensor range, the led will activate, and in the console screen the following lines should be visible: 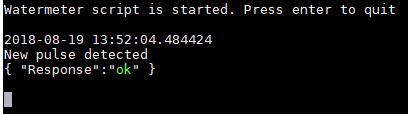
The “Response:ok” is a confirmation that the JSON call to Homeseer is done correctly. So if we check the status of the watermeter counter, it should be increaed with 1:
![]()
Which also means the event ran correctly as well.
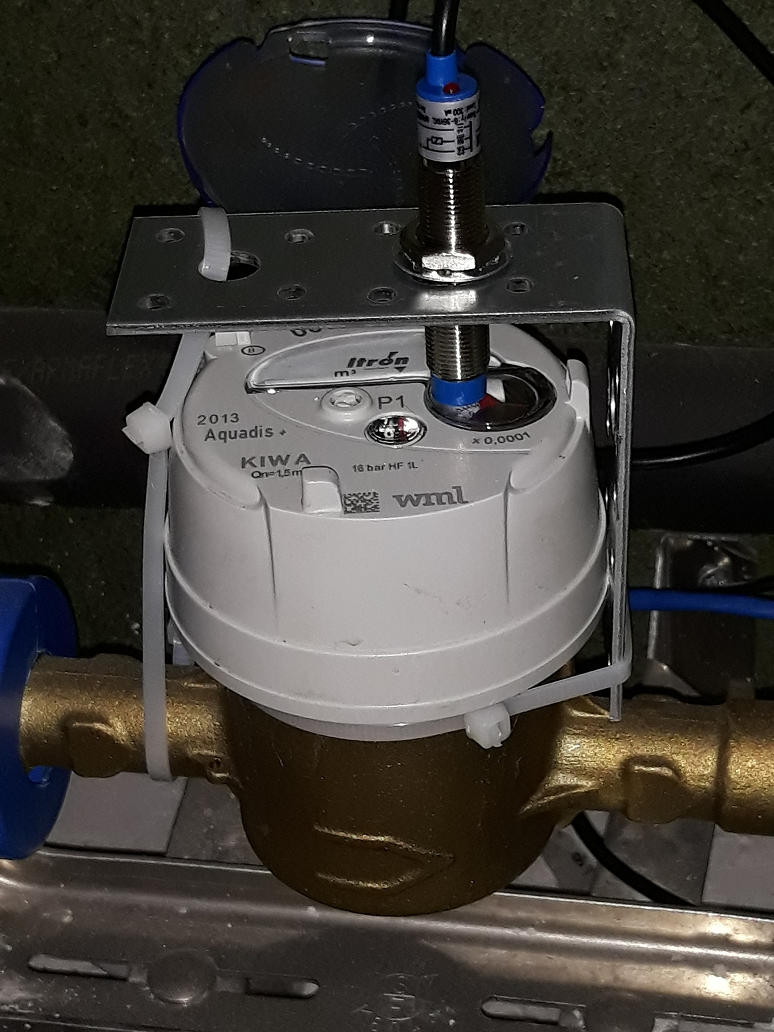
Final setup for watermeter and NPN sensor
Downloads:
 Watermeter.py (1.0 KiB, 2,883 hits)


bonjour, je suis entrain de mettre en place un compteur intelligent qui doit communiqué avec la centrale et le client…je suis bloqué sur le code avec Raspberry pi. qui doit inter réagit avec un réseau de communication par exemple lora, wifi etc
un autre problème, le code de calcul automatique de la consommation d’eau
Hi Gabriel,
Without your code I can’t help you further. Regarding the smartmeter (energy/gas) there are probably other scripts available online that will do already the trick for you and you don’t have to reinvent the wheel. In this case you only have to add the waterpart script into it.
Kind regards,
Rutg3r
Hi Rutger,
I stumpled upon your project some time ago and have the sensor (same model as yours) up and running.
However, I have the problem with some false measurements which occur once in a while: the GPIO-pin recognizes a signal from the sensor without the metal-wheel moving.
I’m currently investigating this. Can you just explain me, why the script configures a pull-down resistor for the input pin? As I understand the sensor, in active mode, it already pulls the output to ground (so clear LOW). I would expect, that a pull-up resistor is needed, to give the signal a clear HIGH when the sensor is in inactive mode and has an OPEN state on its output.
Regards,
Ulrich
Hi Ulrich,
I like your way of thinking, but to be honest the setup that is described in the blogpost was working till I moved recently to a new house. I have to admit that the same sensor and the same setup (identical watermeter, gasmeter has same distance to the watermeter as well as the other equipment, will give a lot of false measurements at the moment. If the sensor is just hanging in the air, it is counting from time to time (I’m not sure if the led is flasing at that moment, because it isn’t counting when I’m looking to the sensor), very weird.
In case you can provide a solution I’m curious what the changes are.
Kind regards,
Rutg3r
Hi Rutg3r,
the false measurements appeared, when I moved from WiFi to ethernet, because the connection often got lost between the PI and my wifi-router. So in my case, this seems to be the entry for the errors as wifi ran without false measurement. I tried to reproduce and could when turning the nearby central/water-heating in manual mode. Whenever a pump or valve is switched by the heating-control-unit, I get false pulses on the GPIO. The ethernet-cable runs in a cabel channel with other power-lines. Maybe thats the problem.
One remark to the sensor: I have the same as you in operation. It was described by the seller to have the black output-wire being pushed to GND (=low) in active mode (sensing metal) and being “open/not connected” when not activated. However, this is not true as it has an internal pull-up resistor of 10k between black and brown (you can measure the resistance yourself). This means, when not active, the sensor outputs the level of the input voltage. In my case: 5V. Luckily, my Pi survived this for nearly a year, although GPIO-input must not be more than 3.3 V. I now use a voltage divider (15k between black and blue/GND) to limit the output in non-active mode to around 3V on the GPIO-pin. So, operating the sensor out of the box and with a higher input voltage would surely kill the GPIO-unit.
Kind regards
Ulrich
Hi Ulrich,
My watermeter.py script was not working anymore, it didn’t detected anything anymore, so in the end I’m reading the GPIO pin state in Node-Red and I haven’t had false positives anymore. Very strange this all….
No working for mee on rapsberry first generation… 🙁
Hi Xav,
I see in my blogpost that I’m using version 2B, which is the oldest Pi that I own. Can you specify what isn’t working? Is the sensor working in first place? Is the script on the Pi triggered when there is a Pulse from the sensor?
What is the function of ( pi ) switch in the center of meter to cover?
Please I need support with some one have experanc.
He can contact me in my WhatsApp number +256797330732
Hi, I have a doubt : You connect directly the black wire to a GPIO input and the output of the sensor can be 5V but the GPIO works with a 3.3V, Is it dangerous for the Raspberry pi? Can the raspberry allow a 5V in signal?
Hi Gabriela,
I’ve read somewhere on the internet that the sensor can operate without issues when it’s connected to a 3.3v source, despite the sensor is made for 5v input, so I did the same. I don’t have any issues so far. I don’t think the Pi will have issues because of this. I expect earlier that the sensor should not operate as it should because of the voltage difference, but in both cases, it’s working fine.
Kind regards,
Rutg3r
Hi Rutger, Great, simple design. Works great. Thanks!
Hi Hans,
Tnx for the positive feedback. In case you need something new, you can always contact me. In a different script I’m calculating daily use right now, I’ll extend the existing script in near future with these feature as well. ofcourse only for water. Besides this the values will be stored in MySQL each hour.
example: