My family members at home wanted to have a shared calendar for events/appointments that are happening within the household and they want to have the upcoming events listed on the real-time dashboard. Pretty straightforward forward, however they want to mark an event as done manually when the event is done. So the task should remain visible on the dashboard until they say/mark it, it can disappear from the dashboard. Listed events that are in the past should be marked as red color on the dashboard as a clear separation of what should have been done and the ones that are upcoming.
This post will explain how I got it working via my existing home automation landscape and how the calendar events from Google are fetched via Node-Red into MQTT, and use a script in Homeseer to save/update the events into a MySQL table. My real-time dashboard will show the events and you mark the events here as “done” and as the last step another script in Homeseer will update the event so it’s “marked as done”.
Needs:
- Login to a Google account from where you want to use the calendar
- Node-Red (in my case installed on a Raspberry Pi)
- MQTT broker (also running on the same Raspberry Pi)
- Homeseer 4
- 2x a vb.NET script (download link available at the bottom of this post)
- MySQL/MariaDB environment (in my case a XAMPP server with PHPMyAdmin included)
- Optional: Real-time dashboard to mark finalized events
Let’s start:
1) Get the public url of the Google calendar
Open your Gmail account from which calendar you want to use. You can open the calendar via the following link: https://calendar.google.com/calendar/u/0/r.
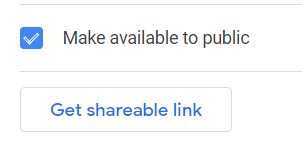
Open the calendar settings in the left menu and scroll down to the “Access permissions for events”. Select the checkbox to make it available to public as shown below.

To get the url to access the public calendar, click on the “Get shareable link” button:
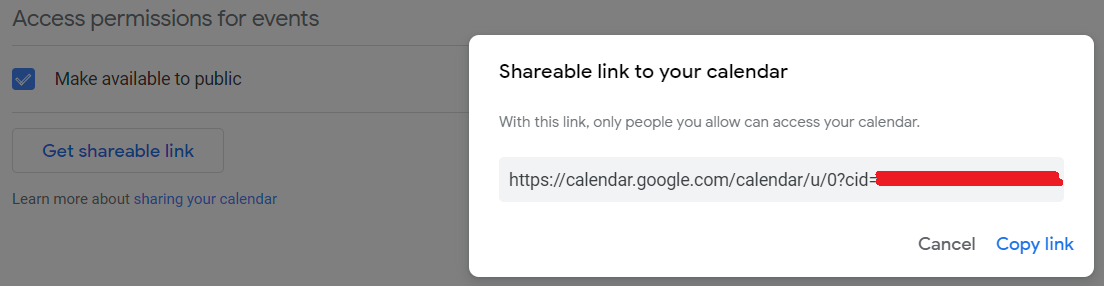
The complete url is shown in a popup. Copy the full url or use the button “Copy link”. Save this link temporarily in a notepad file or so, since we
2) Setup the flow in Node-Red
In Node-Red we are going to setup a quite simple flow. The flow will run every 15 minutes, get events from the Google Calendar and push the results to an MQTT broker.
First, we need to install “node-red-contrib-ical-events” via Menu – Manage Palette – tab Install. Search for “node-red-contrib-ical-events” and click install. After the installation is done, you might need to restart Node-Red. After the installation is done, a few new nodes are available:
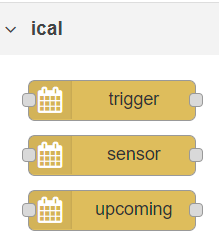
Now the ical nodes are available for use, we are going to build a Node-Red flow that only contains 2 nodes, an ical node and a MQTT node.

We need the “Upcoming” node from the ical section:

Double click this node to change its settings.

Regarding the Config, it will be empty, since there is no config made yet to the Google Calendar. Click the Pencil icon on the right and make the necessary changes:
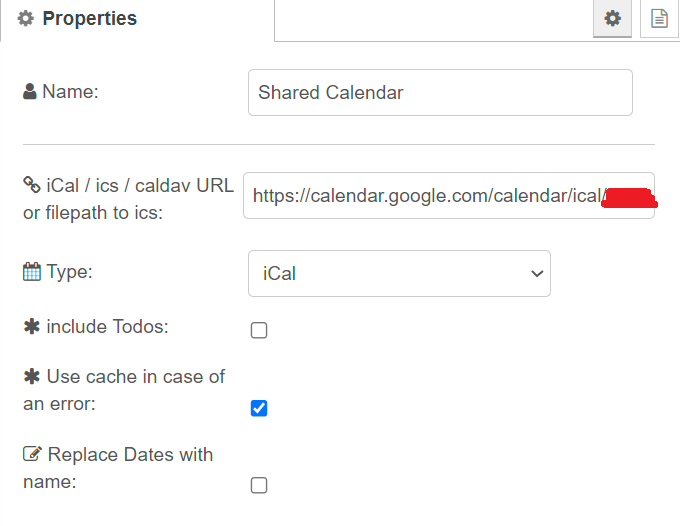
- Set the name of the config below. In my case, I call it “Shared calendar”, since that its the purpose of the calendar usage (between my family members and me).
- The iCal url is earlier saved to a notepad file or so. Paste the full url here. The url and with the extension “ics”.
- Type = iCal
- Select the checkbox for “Use cache in case of error”.
Press the red UPDATE button to save the changes regarding this node.
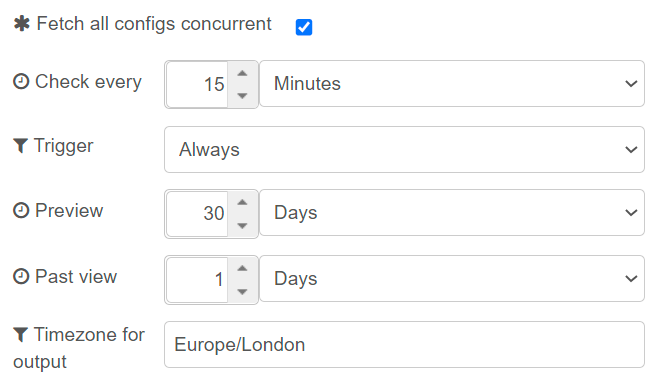
For the other node settings, you can take it over from the screenshot. In this case, the calendar events are fetched every 15 minutes. it will look 30 days in the future and 1 day in the past. Optional you can set a timezone.
Press the red DONE button to save the changes regarding this node.
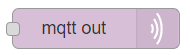
The second and last node for the flow is the “MQTT out” node. This node becomes standard available during the install of Node-Red.
Double click the node to change its settings as below:
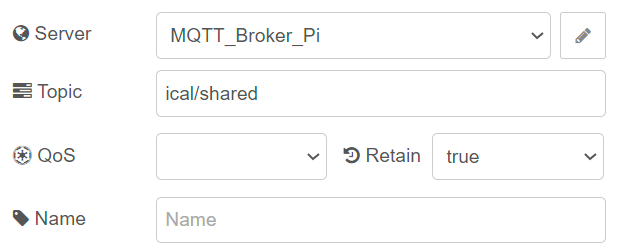
- Select the MQTT broker server. If necessary select the pencil to create a configuration and fill in the IP address of the MQTT broker.
- The Topic entry is how the ical events will be available for the client on the MQTT broker, in this case “ical/shared”
- Retain to True, since I want that other clients that are connecting in a later stage to the MQTT broker, are receiving the latest value right away.
Press the red DONE button to save the changes regarding this node.
The flow runs now every 15 minutes and pushes the calendar result to the MQTT broker in a JSON format.
3) Subscribe to the MQTT topic to get the results in Homeseer 4.
For some reason, I’m not able to get the actual MQTT value in Homeseer 4 anymore via the free plugin “mcsMQTT”. I do get the updated timestamp, but no value is posted. It isn’t related to the amount of data in the MQTT value, so I’ve switched for this purpose to the legacy plugin “MQTT”. The configuration is similar, so I’ll show that here below.
So this is the plugin picture:

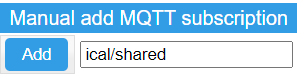
After installation, in the plugin you go to “Subscriptions” and subscribe to the topic that you’ve set in MQTT node in Node-Red. In my case, the topic is “ical/shared” so add that in the text field and press “Add”.
The plugin will show the added subscriptions, and in this case, it will be only one. If you click the Edit button, you can change the floor/room in Homeseer.

If you open the Device page in Homeseer and check the ical/shared device, you’ll see a lot of JSON code. This code will contain all your Google calendar events. Now it’s time to take the JSON result apart and save it into a MySQL table.
4) Use Homeseer script to save calendar JSON to MySQL
The “Google_calendar.vb” script that can be downloaded at the bottom of this post will do the following steps:
- It will get the value from the “ical/shared” virtual device in Homeseer
- It will connect to a MySQL/MariaDB environment
- It will check if the table exists
- If not exists, it will create the table with the necessary columns
- For later purposes, it will create device arraylists with the data per calendar event, for later use as virtual devices in Homeseer. Next to this some calculations will be done to get the right event values
- The unique event identifier for the events will be the “event_summary” in combination with the “event_start date”. This identifier will be used to check if an event already exist in the table. In case there is a recurring event going on in your calendar, the event id’s will be all the same, only the date is different. When using an additional identifier with event_summary + event_start_date, you have a pretty unique id, since you hopefully don’t have identical event names on the same day.
- The script will check if the event exists in the table based on the unique identifier
- If yes, it will update all fields in that existing record. It will do always an update, even when there is no update necessary. If do the UPDATE in all cases, because sometimes you want to change the time of an event. In this case the existing event gets its new values.
- If the event doesn’t exist in the table, it will do an INSERT command and fill in the values.
One of the important columns in the table is the “event_infuture”. This value (true or false) will come directly from the ical event from Google. It will show if the event is in the future or not. In this case, the realtime dashboard can easily mark the event with a different color based on the value More information about this comes later.
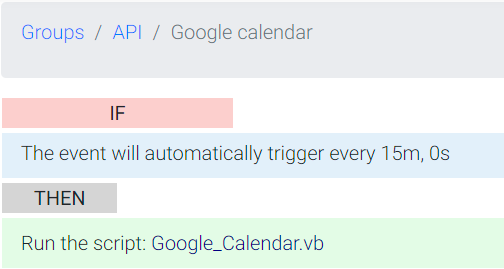
Create an event in Homeseer that will run the script “Google_calendar.vb” every 15 minutes:
5) Show MySQL event data on realtime dashboard
As described in the blogpost https://www.rutg3r.com/hstouch-realtime-responsive-dashboard/ in the section “Setup real-time responsive website” you can easily grab the events from MySQL and save it in variables and show it in a div tag.
// connect to MySQL calendar table
$con = mysqli_connect(‘server‘, ‘username‘, ‘password‘, ‘database‘);
$query = “SELECT * FROM calendar WHERE markeddone = ‘0’ order by event_start_date asc limit 13”;
$result = mysqli_query($con, $query);$x = 0;
while($row = mysqli_fetch_array($result)) {
$event_summary[$x] = $row[‘event_summary’];
$event_start_date[$x] = date(“d-m-Y H:i”, substr($row[‘event_start_epoch’], 0, 10));
$event_start_time[$x] = substr($event_start_date[$x], 11, 5); // remove date from datetime
$event_start_date[$x] = substr($event_start_date[$x], 0, 10);
$event_infuture[$x] = $row[‘event_infuture’];$currentday = date(‘Y-m-d’);
$checkdate = date(“Y-m-d”, strtotime($event_start_date[$x]));
$date1=date_create($currentday);
$date2=date_create($checkdate);
$diff=date_diff($date1,$date2);
$date_diff[$x] = $diff->format(‘%r%a’);if ($date_diff[$x] == -1) {
$event_start_date[$x] = “Yesterday | ” . $event_start_date[$x];
}elseif ($date_diff[$x] == 0) {
$event_start_date[$x] = “Today | ” . $event_start_date[$x];
}elseif ($date_diff[$x] == 1) {
$event_start_date[$x] = “Tomorrow | ” . $event_start_date[$x];
} else {
$event_start_date[$x] = $cal_weekday = date(‘l’, strtotime($checkdate)) . ” | ” . $event_start_date[$x];
}$x++;
}
The php script will do the following actions:
- Make a connection to the calendar table
- Select the last 13 events where markeddone = 0 (the to-do events), sorted by start date (oldest first)
- Do a loop through all the rows from the table result and save it in variables
- Regarding the event date, it will replace the date variable to a more readable format like “Yesterday, Today, Tomorrow or the weekday.
The div with the first event_summary will be shown as following. An extra condition here is used if the “Event_infuture” variable is set. In the first few variables it will not be an issue, however, in certain less busy calendar periods there are not so much events and you don’t want to show errors because the variables aren’t set.
<div id=”event_summary0″>
<?php
if (isset($event_infuture[0])) {
if($event_infuture[0] <> “False”) {
echo “<span style=’color:00B19D’>$event_summary[0]</span>”;
} else {
echo “<span style=’color:red’>$event_summary[0]</span>”;
}
} else {
echo “-“;
}
?>
</div>
The same for the date div:
<div id=”event_start_date0″>
<?php
if (isset($event_infuture[0])) {
if($event_infuture[0] <> “False”) {
echo “<span style=’color:00B19D’>$event_start_date[0]</span>”;
} else {
echo “<span style=’color:red’>$event_start_date[0]</span>”;
}
} else {
echo “-“;
}
?>
</div>
And the same for the time div:
<div id=”event_start_time0″>
<?php
if (isset($event_infuture[0])) {
if($event_infuture[0] <> “False”) {
echo “<span style=’color:00B19D’> | $event_start_time[0]</span>”;
} else {
echo “<span style=’color:red’> | $event_start_time[0]</span>”;
}
} else {
echo “-“;
}
?>
</div>
On index.php the div names have to be added to the “checkForChange” function.
Further down below in the Body, the script below will be used to show the actual event name, start date and start time.
<ul class=”list-group borderless active” data-unit=”wash-machine”>
<li class=”list-group-item d-flex pb-0″>
<h5><calendarr sort=’0′><span id=”event_summary0″></span></calendarr></h5>
<p class=”ml-auto status”><span id=”event_start_date0″></span><span id=”event_start_time0″></span></p>
</li>
</ul>
On the real-time dashboard it can be shown like this:

6) Mark selected event as done in MySQL table
No matter if an event is not in the future anymore, you want to “remove” it from the event list, since it’s been “done”.
For this I’ve added an extra tag in the html part, so it can be trigger by a Jquery script at the bottom part of the index.php page.
As an example, event0 html code will be:
<h5><calendarr sort=’0′><span id=”event_summary0″></span></calendarr></h5>
The “calendarr” html with object “sort and its value 0, will be used in the Jquery script. value 0 is equal to the first entry of the list (0 in array way of reading). Since its hard to put a php value into a html tag, in real time, without having to refresh the website, I’ll use it like this.
The Jquery script will be:
<script>
$(document).ready(function(){
$(“calendarr”).click(function(){var $Device = $(this).attr(“sort”); // Event Group
console.log(‘cal: ‘ + $Device);
$.ajax({
type: ‘GET’,
url: “http://192.168.1.27/JSON?request=controldevicebyvalue&ref=326&”,
data: {
value: $Device
//name: $Device2
},
error: function (jqXHR, textStatus, errorThrown) { console.debug (textStatus, errorThrown); }
});});
});
</script>
The object”sort” with value 0 in this case, will be used to save the 0 value into a virtual device in Homeseer. This virtual device has to be created manually. In this case the device Ref = 326.

As an example, when the 2nd calendarr entry is pressed, the value 1 will be saved into the virtual device., etc, etc.
The trick here is that when the virtual device value is set to any value, a new event will be triggered with the action to run an additional script.
Let’s create first the new event:
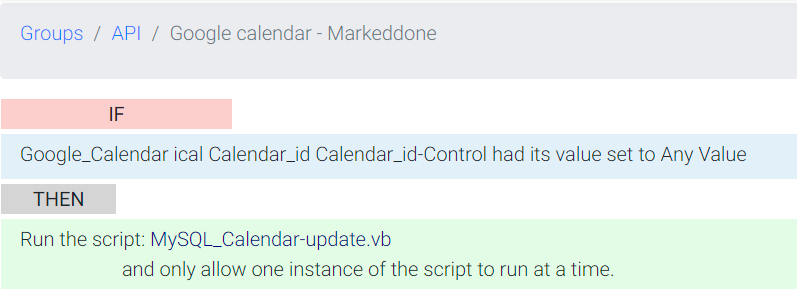
A side note, I’ve set that the event can’t re-run for 5 seconds, so the dashboard has time to refresh its data.
The script will get its value from the virtual device and use this value to do an UPDATE statement for markeddone = 1 for that specific row in the same results when loading the 13 first events with markeddone = 0. The realtime dashbaord will then show a second later not that specific event anymore.
Is this a foolproof way of working? No, but for our occasion, this will work fine.
Release Notes:
| November 07, 2021 | v4.1
|
Script: Google_calendar.vb
Script: MySQL_Calendar_update.vb
|
Downloads:
 Google_Calendar 4.1.zip (5.2 KiB, 140 hits)

