I run a GoodWe GW5K-DT solar inverter, and for a long time the only way to get data into Home Assistant was through the GoodWe SEMS portal — cloud-dependent, slow, and completely useless when the internet is down or via Wifi dongle, which causes a lot of traffic on the network and had timeouts from time to time. With the Dutch salderingsregeling being cancelled in 2027, having real-time local control over my grid export became a priority,where the wifi dongle had a 15second response/delay, I wanted to have a close to realtime solution. So I wired up a Waveshare RS485-to-ETH (B) converter and integrated the inverter directly into Home Assistant over Modbus RTU-over-TCP. Here’s exactly how I did it.
Why local Modbus instead of the cloud?
The GoodWe SEMS cloud integration gives you inverter data, but with a polling delay of several minutes and no write access. You can’t adjust export limits or react to real-time consumption. Since I want to dynamically cap grid export to zero — and do it locally without any cloud dependency — Modbus RTU is the right tool. The GW5K-DT exposes its full register map over RS485, and the Waveshare RS485-to-ETH (B) bridges that serial bus to TCP, making it accessible to Home Assistant’s Modbus integration as if it were a native TCP device.
Hardware and wiring
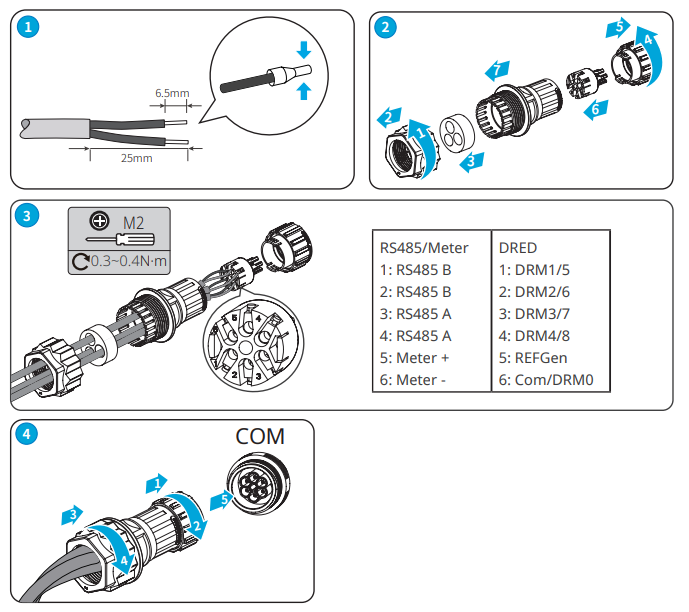
The GW5K-DT has an RS485 port on its communication board. The Waveshare RS485-to-ETH (B) connects to it with a 2-wire run: RS485 A+ and RS485 B−. On the Waveshare side you connect those to the TA and TB screw terminals. That’s it for wiring — no termination resistor needed at this cable length.
https://www.waveshare.com/wiki/RS232/485/422_TO_POE_ETH_(B)

The Goodwe inverter normally comes out of the box with the RS485 connector, however in my case this was not available anymore. I’d to purchase it and, yes, they are quite expensive. The only place in Europe is here: https://sklep.letmerepair.pl/en_US/p/GoodWe-6-pin-connector-black-184-20012-01-/4970
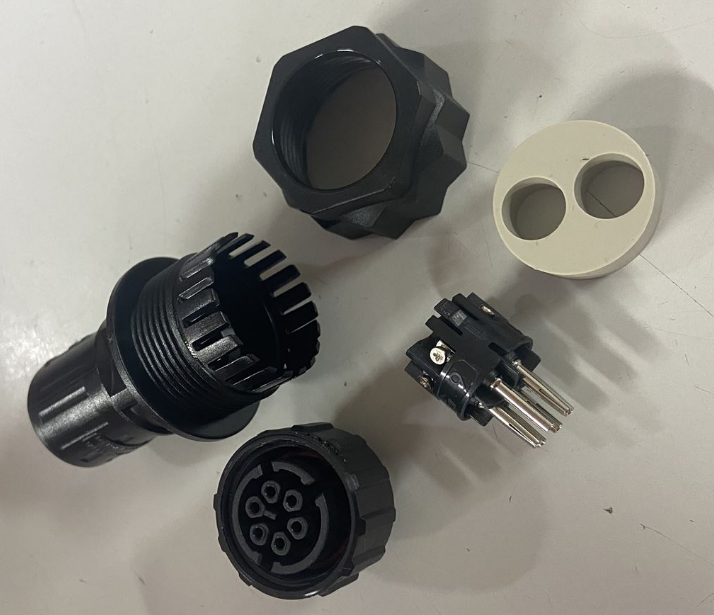
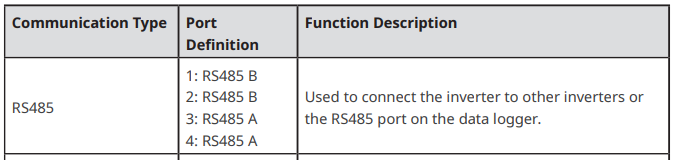
Find in your Goodwe inverter manual how the pinout is arranged. In my case I used pin 1 and 4.
Assemble the connector with the two wires. On the side of the connector where the pins are located, the pin number is printed (between the screw and the pin, In the second picture pin number 6 is visible.
One important caveat: the GoodWe WiFi dongle and the RS485 port share the same internal communication bus. If both are active at the same time, you get bus contention and neither works reliably. After confirming the settings in the inverter via the SolarGo app (TCP integration, COM Address (which is the Modbus address and the Baud rate:
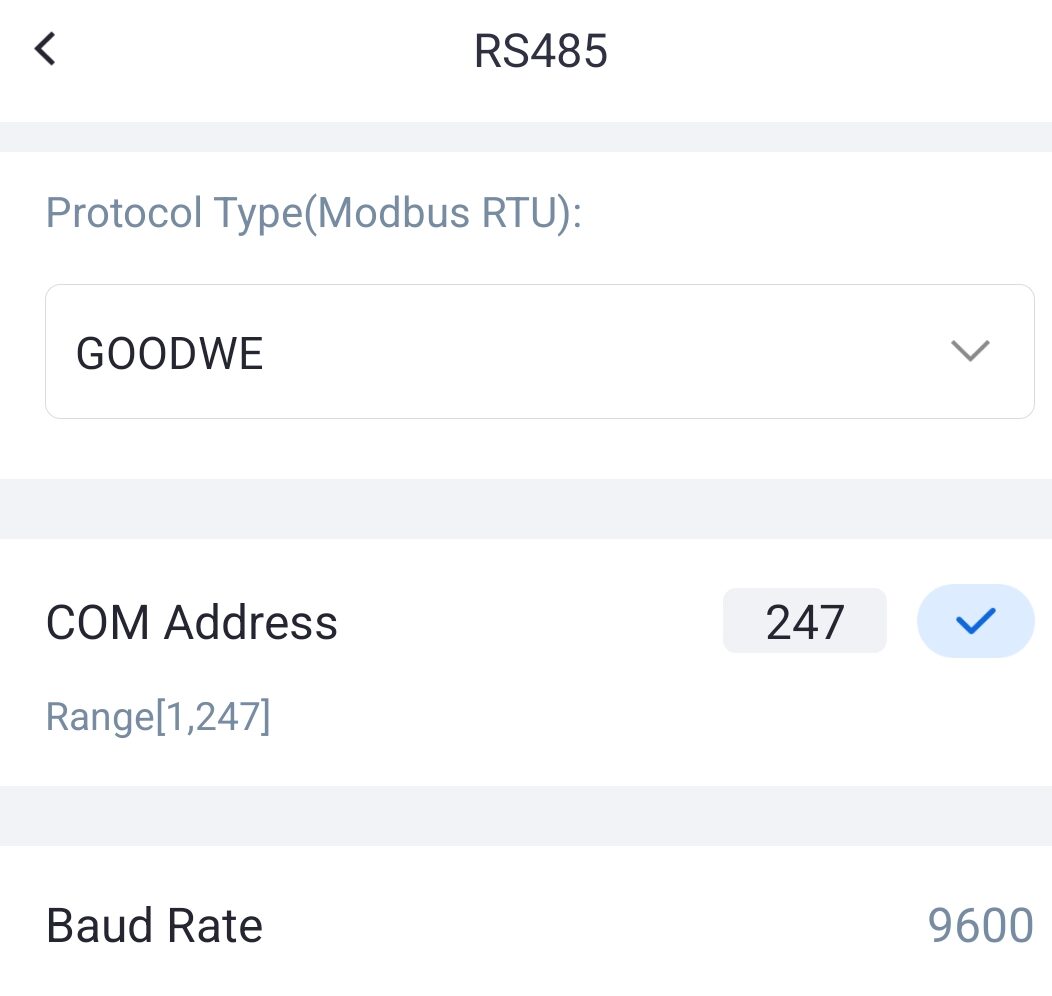
Modbus is enabled by default, so make sure these are the settings.
Waveshare network placement: I put the Waveshare converter on IoT VLAN 20 with a static IP at 192.168.20.36 (adjust to your subnet). It sits on its own isolated VLAN so it’s reachable from the Home Assistant VM but not from the rest of the network and can’t connect to the outside world. Benefit of this specific model, it has PoE (green label at the front).
Waveshare RS485-to-ETH (B) web UI configuration
Access the Waveshare web UI at its IP address. The key settings to configure:
- Work Mode: TCP Server
- Local Port: 502 (standard Modbus TCP port)
- Baud Rate: 9600
- Data Bits: 8
- Stop Bits: 1
- Parity: None
- Transfer Protocol: Modbus TCP to RTU (this is the critical one — it handles the frame conversion automatically)
With “Modbus TCP to RTU” mode enabled, Home Assistant sends standard Modbus TCP frames and the Waveshare transparently converts them to RTU on the RS485 wire. No custom framing needed on the HA side.
Home Assistant Modbus configuration
The GW5K-DT uses Modbus slave address 247 (0xF7). All configuration goes in configuration.yaml. The register map below covers the most useful sensors plus the writable export limit register.
modbus:
  - name: GoodWe_GW5K_DT
    type: tcp
    host: 192.168.1.20.36  # Waveshare IP
    port: 502
    delay: 1
    timeout: 5
    retry_on_empty: true

    sensors:
      - name: GoodWe PV Power
        slave: 247
        address: 3542  # 0xDGE6
        input_type: holding
        data_type: uint16
        scale: 1
        precision: 0
        unit_of_measurement: W
        device_class: power
        state_class: measurement
        scan_interval: 30

      - name: GoodWe Grid Power
        slave: 247
        address: 3551  # 0xDDF7
        input_type: holding
        data_type: int16
        scale: 1
        precision: 0
        unit_of_measurement: W
        device_class: power
        state_class: measurement
        scan_interval: 30

      - name: GoodWe House Load
        slave: 247
        address: 3547  # 0xDB0B
        input_type: holding
        data_type: uint16
        scale: 1
        precision: 0
        unit_of_measurement: W
        device_class: power
        state_class: measurement
        scan_interval: 30

      - name: GoodWe Battery SOC
        slave: 247
        address: 3593  # 0xDE19
        input_type: holding
        data_type: uint16
        scale: 1
        precision: 0
        unit_of_measurement: "%"
        device_class: battery
        state_class: measurement
        scan_interval: 60

      - name: GoodWe Daily PV Energy
        slave: 247
        address: 3535  # 0xDBD7
        input_type: holding
        data_type: uint16
        scale: 0.1
        precision: 1
        unit_of_measurement: kWh
        device_class: energy
        state_class: total_increasing
        scan_interval: 60

    numbers:
      - name: GoodWe Grid Export Limit
        slave: 247
        address: 256   # 0x0100
        min_value: 0
        max_value: 5000
        step: 10
        data_type: uint16
        unit_of_measurement: W
A few notes on the register map:
- Grid power (register 3551) is a signed int16 — positive means importing, negative means exporting. I use this in my export limit automation.
- The export limit register (256 / 0x0100) is writable. Writing 0 disables export entirely; writing 5000 allows full export up to inverter capacity.
- Slave address 247 (0xF7) is the GoodWe default — do not change this unless you’ve reconfigured your inverter.
Export limit automation
With the writable register exposed as number.goodwe_grid_export_limit, I built an automation that watches sensor.template_energy_netto3 (my net grid power template sensor) and adjusts the export limit in 10 W steps every 30 seconds, targeting zero grid export. When the sensor goes positive (importing from grid), the limit is increased; when negative (exporting to grid), it’s decreased. This keeps the inverter permanently at the edge of zero export without any hard cutoff.
This automation will become critical in 2027 when the Dutch salderingsregeling ends and exported energy is no longer compensated at full retail rate.
Result
The GoodWe GW5K-DT is now fully integrated into Home Assistant with local Modbus triggered every 6/7 seconds based on when the current energy usage (production minus consumption) is updated via the DSMR integration. No cloud dependency, and a writable export limit register that my automation controls in real time. PV power, grid power, house load, battery SOC, and daily yield are all native HA entities — available for dashboards, energy monitoring, and automations.
If you’re running a GoodWe inverter with an RS485 port, the Waveshare RS485-to-ETH (B) is a clean, inexpensive bridge that requires minimal configuration. The “Modbus TCP to RTU” mode on the Waveshare does all the heavy lifting — Home Assistant talks standard Modbus TCP and never needs to know about the RS485 layer underneath.
At the bottom of the post, you’ll find the attachments with the yaml code.
My sensors are not all in the configuration.yaml, but per type seperated. On the referral to the other yaml file i s present in the configuration.yaml, like this:

In my case the modbus: !include config_goodwe_modbus.yaml is added.
In the first attachment below, the content for config_goodwe_modbus.yaml is presented. After this specific file is created, you can copy/paste the yaml code as in (based on your personal RS485 configurations (line 10, 11 and 12).
Other custom sensors are added to my config_templates.yaml file. Examples are for calculation the produced power per PV string. I’ve two, one on East and one for South positioning. The default Modbus sensors are only showing the Voltage and Ampere per string, so Power (W) needs to be calculated.