My smart meter has been feeding DSMR Reader for years. It runs in Docker on my QNAP NAS through Container Station, with a PostgreSQL database next to it, and Home Assistant picks up every telegram over MQTT. It simply works, and that is exactly why I hardly ever updated it. An update meant logging into the NAS over SSH, making a database dump, pulling the new image, restarting the stack and then watching the logs and hoping the migrations went fine. Not really something I felt like doing on a random weekday evening.
After I built my one-click Immich update button, DSMR Reader was the obvious next candidate for the System Updates popup on my Home Assistant dashboard. This one needed a bit more care though, because that database holds years of energy data that I really don’t want to lose. So instead of a simple pull-and-restart, the update now makes a verified backup first and only calls it a success when a fresh telegram has actually been stored after the restart. In this post I’ll share the complete setup, including the things that went wrong along the way. All scripts, the Home Assistant configuration and the card templates are in my ha-dsmr-update repository on GitHub, so you don’t have to copy them from this page.

How it fits together
All my helper scripts live in /opt/scripts on my Proxmox host, and I wanted to keep it that way. Home Assistant already has an SSH key for Proxmox, cron runs there, and I have one place for scripts and logs. Proxmox in turn talks to the QNAP over SSH. The chain looks like this:
- A check script on Proxmox looks at the image the running DSMR container uses and compares it with the newest image in the GitHub container registry
- The result is published as retained MQTT messages under
dsmr/ha-update/ - Home Assistant turns those messages into sensors, and a custom button-card in my System Updates popup shows the current and latest version
- The UPDATE button runs a Home Assistant script, which calls a shell_command that starts
update-dsmr.shon Proxmox in the background - The update script makes the backup, pulls the new image, restarts the stack, verifies everything and reports its progress over MQTT
- The Home Assistant script waits for the result, double-checks that new readings arrive in Home Assistant itself and sends me a notification when something is off
What a safe update has to do
My manual routine was always the same: dump the database, copy the compose file, pull, docker compose down, docker compose up -d, prune old images and check the logs. The script does exactly that, but with a few guardrails I never bothered with when doing it by hand.
First of all, it never runs docker compose down -v. The -v removes the volumes, and with that your entire energy history. Second, it only pulls the DSMR Reader image by default. My PostgreSQL image is pinned to 16-alpine, but if yours runs on latest, pulling it could jump to a new major version and that is not something you want to happen as a side effect. Third, the database dump is checked before anything else happens. A pg_dump always ends with the line “PostgreSQL database dump complete”, so if that line is missing, the update stops right there.
And finally, old images are only pruned after the new version has proven itself. If the new container doesn’t come up, the previous image is still there and rolling back is a single docker tag away.
Step 1: One config file
The code in this post shows the important parts. The complete files, plus a README with the installation steps, are in the GitHub repository.
Both scripts read their settings from /opt/scripts/dsmr-update.conf. That keeps the scripts generic and puts the password, if you use one, in a single file that only root can read (chmod 600).
QNAP_HOST=192.168.1.95
QNAP_USER=rutger2
QNAP_PASS=""                      # empty = use an SSH key
QNAP_KEY=""

COMPOSE_DIR=/share/CACHEDEV1_DATA/Container/dsmr
DSMR_SERVICE=dsmr                 # the compose SERVICE name, not the container name
DSMR_APP_DIR=/app
PULL_SERVICES="dsmr"
DB_CONTAINER=dsmrdb
DB_USER=dsmrreader
DB_NAME=dsmrreader
BACKUP_KEEP=5
BACKUP_DIR=/share/CACHEDEV1_DATA/HASS-Backups/dsmr/updates

DSMR_URL="http://<qnap-ip>:7777/"
VERIFY_TIMEOUT=300

MQTT_HOST=<mqtt-broker-ip>
MQTT_PORT=1883
MQTT_BASE=dsmr/ha-update
When QNAP_PASS is filled in, the scripts use sshpass -e, which reads the password from an environment variable instead of the command line, so it doesn’t show up in the process list. An SSH key is still the nicer option though.
Step 2: Running commands on the QNAP
The QNAP side needed some extra attention. Over a non-interactive SSH session, Container Station’s docker binary isn’t on the PATH, and the shell is a plain sh instead of bash. I solved that with one helper function in dsmr-common.sh that every other step uses. It sends a small POSIX shell snippet to the QNAP, fixes the PATH, jumps into the compose folder and figures out whether to use docker compose or the older docker-compose:
qnap_run() {
  qnap_ssh 'sh -s' <<EOF
export PATH="\$PATH:/share/CACHEDEV1_DATA/.qpkg/container-station/bin:/usr/local/bin:/opt/bin"
cd '$COMPOSE_DIR' || { echo "ERR cannot cd to $COMPOSE_DIR"; exit 1; }
if docker compose version >/dev/null 2>&1; then DC='docker compose'; else DC='docker-compose'; fi
DSVC='$DSMR_SERVICE'; DBC='$DB_CONTAINER'; DBU='$DB_USER'; DBN='$DB_NAME'
BDIR='${BACKUP_DIR:-backups}'; APPDIR='${DSMR_APP_DIR:-/app}'
$1
EOF
}
The same file also holds a small mqtt_pub wrapper around mosquitto_pub, so on Proxmox you need mosquitto-clients, jq and curl, plus sshpass if you go the password route.
Step 3: Checking for a new version
My first idea was to compare the version of the running container with the latest GitHub release of the Docker image project. That gave me a card saying “6.2.0 → 2025.12.31”, which is comparing apples with oranges. The version label inside the image is DSMR Reader’s own version number, while the GitHub releases of the Docker project use dates and aren’t published for every image build.
So the check now works with image digests instead. It reads the digest of the image the running container uses, asks the registry for the digest of the latest tag with an anonymous pull token, and if the two differ there is an update. To show a proper version number on the card, it then downloads the config of the new image for the right architecture and reads its org.opencontainers.image.version label. The heart of the check looks like this:
remote_digest "$image"; remote=${REMOTE_DIGEST:-}

if [[ " $digests " == *"@$remote "* ]]; then
  avail=false; latest=$current
else
  avail=true
  latest=$(remote_version "$arch")
  [[ $latest == "$current" ]] && latest="$latest (rebuild)"
fi

mqtt_pub update_available "$avail"
mqtt_pub current_version "$current"
mqtt_pub latest_version "$latest"
mqtt_pub last_check "$(date -Iseconds)"
The “(rebuild)” part covers the case where the maintainer pushes a new image with the same version number, so I can still see why the card says there is an update. The check runs every six hours from cron on Proxmox, and the REFRESH button on the card runs it on demand:
17 */6 * * * /opt/scripts/dsmr-update-check.sh >>/var/log/dsmr-update-check.log 2>&1
Step 4: The update script
update-dsmr.sh logs everything to /var/log/update-dsmr.log, takes a lock so it can’t run twice at the same time, and publishes a JSON status message to dsmr/ha-update/update_status after every phase. That status is what Home Assistant waits for.
The backup is the first phase, and if it fails, nothing else happens. The dump is written to a separate folder on the NAS, checked for the closing line, compressed and rotated so the last five are kept:
f="$BDIR/dsmr_backup_$STAMP.sql"
docker exec "$DBC" pg_dump -U "$DBU" "$DBN" > "$f" || exit 1
tail -c 400 "$f" | grep -q 'PostgreSQL database dump complete' || { echo "ERR dump incomplete"; exit 1; }
gzip -f "$f"
cp docker-compose.yml "$BDIR/docker-compose_$STAMP.yml"
Next, it remembers the image ID of the running container and pulls the new image. If the image ID didn’t change, there is nothing to restart and the script stops with “Already up to date”. Otherwise it runs docker compose down and docker compose up -d.
The verification is the part I like most. Every 15 seconds the script asks DSMR Reader itself for the timestamp of the newest reading in the database, using Django’s management shell inside the container:
docker exec -w "$APPDIR" "$cid" python3 manage.py shell -c \
  "from dsmr_datalogger.models.reading import DsmrReading as R; r=R.objects.order_by('-timestamp').first(); print(r.timestamp.isoformat() if r else '')"
The update only counts as successful when the container is running, that reading is newer than the moment of the restart, and the web interface answers. After that, it scans the container log since the restart for migration lines and errors, prunes the old image and runs the check script again so the card flips to Up to date. If the verification doesn’t pass within five minutes, the status becomes “failed” with the rollback command in the message, and the old image is left alone.
Step 5: Home Assistant
On the Home Assistant side there are four pieces: MQTT sensors, two shell commands, a helper and a script. The sensors go into my config_mqtt.yaml. Make sure they end up in the sensor: list and not under binary_sensor:, because that is exactly what I did first, and Home Assistant complained that timestamp is not a valid binary sensor device class.
- name: "MQTT DSMR Update Available"
  unique_id: mqtt_dsmr_update_available
  state_topic: "dsmr/ha-update/update_available"
- name: "MQTT DSMR Current Version"
  unique_id: mqtt_dsmr_current_version
  state_topic: "dsmr/ha-update/current_version"
- name: "MQTT DSMR Latest Version"
  unique_id: mqtt_dsmr_latest_version
  state_topic: "dsmr/ha-update/latest_version"
- name: "MQTT DSMR Last Check"
  unique_id: mqtt_dsmr_last_check
  state_topic: "dsmr/ha-update/last_check"
  device_class: timestamp
- name: "MQTT DSMR Update Status"
  unique_id: mqtt_dsmr_update_status
  state_topic: "dsmr/ha-update/update_status"
  value_template: "{{ value_json.state }}"
  json_attributes_topic: "dsmr/ha-update/update_status"
The shell commands use the same SSH options as my Immich ones. The update command starts the script with nohup and returns immediately, so it doesn’t run into the 60-second limit of shell_command:
proxmox_check_dsmr: >-
  ssh -i /config/.ssh/id_ed25519_proxmox
  -o UserKnownHostsFile=/config/.ssh/known_hosts
  -o StrictHostKeyChecking=accept-new
  -o BatchMode=yes
  -o ConnectTimeout=10
  root@<proxmox-ip>
  "/opt/scripts/dsmr-update-check.sh >> /var/log/dsmr-update-check.log 2>&1"

proxmox_update_dsmr: >-
  ssh -i /config/.ssh/id_ed25519_proxmox
  -o UserKnownHostsFile=/config/.ssh/known_hosts
  -o StrictHostKeyChecking=accept-new
  -o BatchMode=yes
  -o ConnectTimeout=10
  root@<proxmox-ip>
  "nohup /opt/scripts/update-dsmr.sh > /dev/null 2>&1 < /dev/null &"
The helper input_boolean.dsmr_update_running tells the card that an update is in progress. The script script.proxmox_update_dsmr ties it all together. It only runs when an update is actually available, waits up to 30 minutes for the update script to report “ok” or “failed”, and then checks that sensor.dsmr_reading_timestamp moves forward in Home Assistant. That last step is a nice extra safety net: DSMR Reader can be perfectly healthy while its MQTT output to Home Assistant is broken, and I want to know about that too.
alias: Proxmox - Update DSMR
mode: single
sequence:
  - condition: state
    entity_id: sensor.mqtt_dsmr_update_available
    state: "true"
  - variables:
      started: "{{ now().timestamp() }}"
  - action: input_boolean.turn_on
    target:
      entity_id: input_boolean.dsmr_update_running
  - action: shell_command.proxmox_update_dsmr
    response_variable: ssh_result
  - if:
      - condition: template
        value_template: "{{ ssh_result.returncode != 0 }}"
    then:
      - action: input_boolean.turn_off
        target:
          entity_id: input_boolean.dsmr_update_running
      - stop: SSH to Proxmox failed
        error: true
  - wait_template: >-
      {{ states('sensor.mqtt_dsmr_update_status') in ['ok', 'failed']
         and as_timestamp(state_attr('sensor.mqtt_dsmr_update_status', 'finished'), 0) > started }}
    timeout: "00:30:00"
    continue_on_timeout: true
  - choose:
      - conditions:
          - condition: template
            value_template: "{{ not wait.completed }}"
        sequence:
          - action: persistent_notification.create
            data:
              title: DSMR update
              message: No result after 30 min. Check /var/log/update-dsmr.log on Proxmox.
      - conditions:
          - condition: state
            entity_id: sensor.mqtt_dsmr_update_status
            state: failed
        sequence:
          - action: persistent_notification.create
            data:
              title: DSMR update failed
              message: "{{ state_attr('sensor.mqtt_dsmr_update_status', 'message') }}"
    default:
      - wait_template: "{{ as_timestamp(states('sensor.dsmr_reading_timestamp'), 0) > started }}"
        timeout: "00:05:00"
        continue_on_timeout: true
      - if:
          - condition: template
            value_template: "{{ not wait.completed }}"
        then:
          - action: persistent_notification.create
            data:
              title: DSMR update
              message: DSMR Reader was updated, but Home Assistant has not received a new reading within 5 min.
  - action: input_boolean.turn_off
    target:
      entity_id: input_boolean.dsmr_update_running
The dashboard card
Because I already had an app_update button-card template for Immich and Frigate, the DSMR card is mostly configuration. The template builds all its entity names from the app variable, so dsmr automatically points it to sensor.mqtt_dsmr_*, input_boolean.dsmr_update_running and script.proxmox_update_dsmr. The REFRESH button calls the check shell command directly:
type: custom:button-card
template: app_update
entity: sensor.mqtt_dsmr_update_available
name: DSMR Reader
icon: mdi:meter-electric
triggers_update:
  - sensor.mqtt_dsmr_update_available
  - sensor.mqtt_dsmr_current_version
  - sensor.mqtt_dsmr_latest_version
  - input_boolean.dsmr_update_running
  - sensor.mqtt_dsmr_update_status
variables:
  app: dsmr
  repo: xirixiz/dsmr-reader-docker
  confirm: |-
    Update DSMR Reader now?
    The database is backed up first, then the containers restart. Telegrams pause for about a minute.
custom_fields:
  status:
    card:
      type: custom:button-card
      template: pill_button
      name: REFRESH
      tap_action:
        action: perform-action
        perform_action: shell_command.proxmox_check_dsmr
I also added a “DSMR Update” row to the Health Sensors panel on my system view, so an available update shows up there in yellow as well.
The first real update
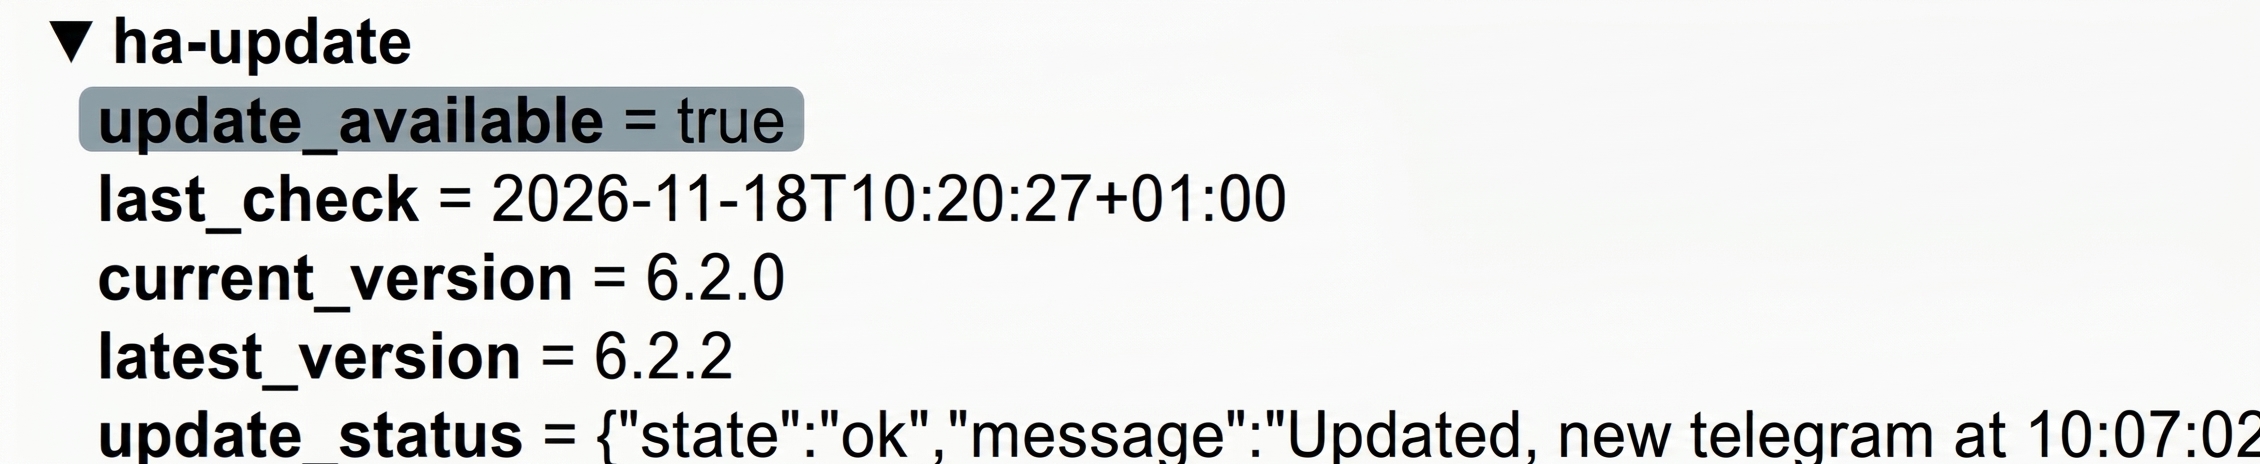
With everything in place, I pressed UPDATE and watched it happen. The backup of about 5.8 MB was done within seconds, the new image came in, the stack restarted and DSMR Reader went from 6.2.0 to 6.2.2 without any database migrations. The whole run took about three minutes, and most of that was the verification loop waiting for the first new telegram to be stored. Shortly after, the card switched to Up to date.
One small thing I noticed in the log: the “new telegram” was stamped 10:07:02 while the script finished at 10:06:13. The telegram timestamp comes from the clock of the smart meter itself, which turns out to run about 50 seconds ahead of my Proxmox host. It didn’t matter this time, because Home Assistant confirmed the fresh readings independently, but it is good to know when you rely on meter timestamps.

Things that bit me
It didn’t all work on the first try, and most of the issues were the kind you only find on a real system:
- Service name versus container name. My notes said
docker compose logs dsmr-reader, but the compose service is simply calleddsmr. The check failed with “container for service dsmr-reader not found” until I looked at the SERVICE column ofdocker compose ps. - A placeholder left in a shell command. The REFRESH button did nothing, and the shell_command response said
/bin/sh: can't open same. The shell had read<same key as immich>from my template as an input redirect. Calling the shell_command with a response is the quickest way to see what is really going on. - Variables lost in a subshell. The registry lookup stored its token and repository in variables for the version lookup, but I called it as
$(remote_digest ...). That runs in a subshell, so the variables were gone andset -ustopped the script with “TAG: unbound variable”. Calling the function directly fixed it. - Windows line endings in the compose file. An automated edit to add a volume said it succeeded but changed nothing.
cat -Ashowedprivileged: true^M$, so my pattern never matched. Since then, every automated edit checks that the new line is really there before it continues. - Not being root on the NAS. My SSH user is an administrator on the QNAP, but not root, so a
chownon the host was not permitted. More on that below.
Bonus: DSMR Reader’s own backups were failing
The log scan after the first update found one error, and it had nothing to do with the update itself:
ERROR schedule execute_scheduled_processes | (PermissionError) dsmr_backup.services.backup.run errored: [Errno 13] Permission denied: '/app/backups'
DSMR Reader has a built-in daily backup, and it writes to backups/ inside its installation folder. In my container that folder didn’t exist, and the application runs as the user app (uid 1000), which isn’t allowed to create folders in the root-owned /app. In other words, the built-in backup had probably never worked on my setup. The update only made it visible, because the scheduler ran right after the restart.
The fix was to give /app/backups a home on the NAS. I added a bind mount to the dsmr service in the compose file, pointing to a folder on my HASS-Backups share:
    privileged: true
    volumes:
      - /share/CACHEDEV1_DATA/HASS-Backups/dsmr/daily:/app/backups
Because my SSH user can’t change ownership on the QNAP, I let the container do it instead. docker exec as root inside the container can change the owner of the mounted folder, and a quick write test as the app user confirms it works:
docker compose up -d dsmr
docker exec -u 0 dsmr chown -R app:app /app/backups
docker exec -u app dsmr sh -c 'touch /app/backups/.t && rm /app/backups/.t && echo "WRITE OK"'
In the DSMR Reader backup configuration, the storage folder stays at the default backups/, since that is relative to /app. The file name contains the day of the week, so there are never more than seven daily backups. To test it right away, I set the backup timestamp to now, saved, and a few seconds later the first backup appeared on the NAS. Don’t forget to set the time back to the night afterwards, because creating a backup briefly slows DSMR Reader down.
The pre-update dumps from my script now live next to it in HASS-Backups/dsmr/updates. I deliberately kept them in a separate folder, because the daily folder belongs to the container user and my SSH user needs to be able to write and clean up its own files.
Wrapping up
Updating DSMR Reader is now a single tap in my System Updates popup, and it is safer than my manual routine ever was. Every update starts with a verified database dump, the old image stays around until the new one has stored a fresh telegram, and Home Assistant tells me when something doesn’t add up. As a bonus, DSMR Reader’s own daily backups finally work and land on my NAS together with the pre-update dumps.
If you want to build this yourself, you’ll find everything in my ha-dsmr-update repository on GitHub: the three scripts, an example config, the Home Assistant YAML, the button-card templates and an example compose file with the backup mount. For background, the DSMR Reader documentation and the dsmr-reader-docker project are good starting points. The approach itself works for any Docker app on a NAS: check the image digest, back up first, verify with real data and only then clean up.